Why Is the Fuel Gauge on Your Scooter Not Working? Find Solutions Now!
The fuel gauge on the scooter is not working, possibly due to a malfunctioning sensor. This can be resolved by checking the sensor connections and replacing them if necessary.
If you own a scooter and are experiencing issues with the fuel gauge not working, it can be quite frustrating. The fuel gauge is an important component that allows you to monitor the level of fuel in your vehicle. Without a working fuel gauge, it becomes difficult to know how much fuel is left and when you need to refuel.
The most common reason for a malfunctioning fuel gauge is a faulty sensor that is responsible for sending signals to the gauge. We will explore the possible causes of a non-functioning fuel gauge on a scooter and provide some steps to resolve the issue. By understanding the problem and following these steps, you can ensure that your scooter’s fuel gauge is working accurately once again.
Common Causes Of Fuel Gauge Malfunction
A malfunctioning fuel gauge on a scooter can be caused by a variety of factors. Issues with the fuel sensor, wiring problems, or a faulty gauge itself could potentially be the culprits behind the malfunction. It is important to diagnose the exact cause in order to resolve the issue and ensure accurate fuel level readings.
Have you ever experienced the frustration of a fuel gauge not working properly on your scooter? It’s not only inconvenient but can also lead to unexpected fuel shortages. Understanding the common causes of fuel gauge malfunction can help you diagnose and fix the issue efficiently.
Here are some key factors to consider:
Corroded Wiring Connections:
- Corroded wiring connections can often interfere with accurate fuel gauge readings.
- Moisture and exposure to the elements can cause corrosion in the wiring connections, leading to faulty signals.
- It is important to regularly inspect and clean the wiring connections to ensure proper functioning of the fuel gauge.
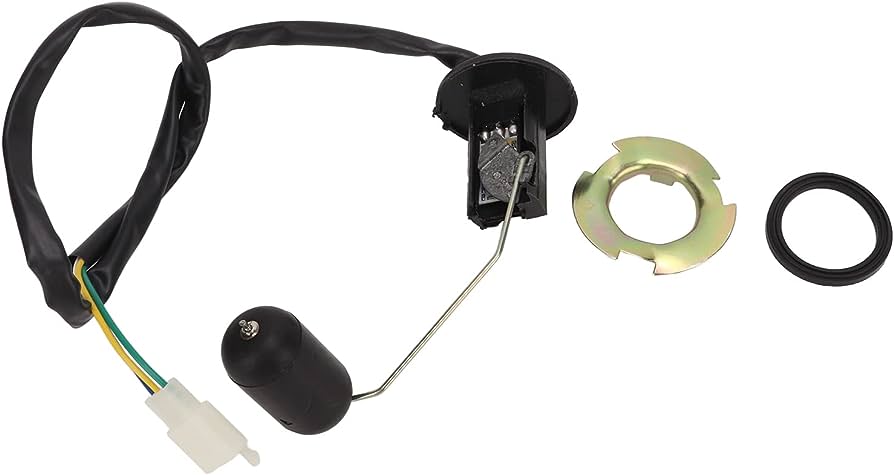
Faulty Fuel Level Sensor:
- A faulty fuel level sensor is another common cause for inaccurate fuel gauge readings.
- The fuel level sensor is responsible for measuring the amount of fuel in the tank and sending the corresponding signal to the gauge.
- Over time, the sensor can wear out or develop faults, resulting in incorrect readings or a gauge that does not function at all.
Broken Fuel Gauge Needle:
- A broken fuel gauge needle is a visible indication of a malfunctioning fuel gauge.
- If the needle does not move or stays stuck at a particular position, it can be due to a broken mechanism inside the gauge.
- Physical damage or wear and tear can cause the needle to break or become misaligned, leading to inaccurate readings.
Keep in mind that fuel gauge malfunction can also be caused by other factors such as a defective gauge cluster or a faulty instrument panel. It is recommended to consult a professional mechanic for proper diagnosis and repair.
Symptoms Of A Faulty Fuel Gauge
If your scooter’s fuel gauge is not working, you may experience symptoms such as inaccurate fuel level readings, fluctuating needle, or a completely non-functioning gauge. It is important to address this issue promptly to avoid running out of fuel unexpectedly.
If you own a scooter and have noticed that your fuel gauge is not working properly, it can be quite frustrating and even leave you stranded on the road. Understanding the symptoms of a faulty fuel gauge can help you diagnose the issue and take appropriate action.
Here are three common symptoms to watch out for:
Inaccurate Fuel Level Reading
- Fuel gauge displays an incorrect level of fuel in the tank.
- The gauge may show a full tank when it’s actually almost empty or vice versa.
- Inconsistent readings that fluctuate while riding or when the scooter is idle.
Fuel Gauge Stuck On Empty Or Full
- The fuel gauge remains at the empty or full mark, regardless of the actual fuel level in the tank.
- No change in reading even when adding fuel to the tank or riding for a considerable distance.
- This can lead to anxiety, as you might not know how much fuel is really left in the tank.
Fuel Gauge Not Moving At All
- The fuel gauge does not display any changes, even when the scooter is being used.
- This can be due to a complete failure of the fuel gauge mechanism or a disconnected wire.
- You might have to rely solely on tracking your distance traveled or estimate fuel usage.
Remember, a faulty fuel gauge can not only be inconvenient but also impact your ability to plan your rides. It is advisable to address the issue as soon as possible to avoid any unforeseen circumstances. Consulting a professional mechanic or authorized service center is recommended for accurate diagnosis and repair.
Diagnosing The Issue
The fuel gauge of your scooter not working? Let’s diagnose the issue and get you back on the road in no time.
Fuel Gauge On Scooter Not Working
Is your scooter’s fuel gauge acting up? Don’t worry, diagnosing the issue might be easier than you think. In this section, we will explore a few troubleshooting steps to help you get to the bottom of the problem. Let’s dive in and find out what might be causing your fuel gauge to malfunction.
Check The Wiring Connections:
- Inspect the wiring connections between the fuel gauge and the fuel level sensor. A loose or damaged connection could be the culprit behind the gauge not working properly. Here are a few steps to follow:
- Start by locating the wiring harness near the fuel tank.
- Ensure that the connections are secure and free from corrosion.
- Gently wiggle the wires and observe if there are any noticeable changes in the fuel gauge’s behavior.
- If you notice any loose connections or corroded wires, try cleaning them with a wire brush to remove any dirt or rust that might be causing the issue.
Test The Fuel Level Sensor:
- The fuel level sensor is responsible for sending the fuel level information to the gauge. A faulty sensor can result in inaccurate readings or a gauge that doesn’t function at all. Here’s how you can test the sensor:
- Locate the fuel level sensor, which is usually mounted inside the fuel tank.
- Disconnect the wiring harness and use a multimeter to check the sensor’s resistance.
- Compare the resistance readings with the manufacturer’s specifications to determine if the sensor is working correctly.
- If the readings are outside the recommended range, it might be time to replace the sensor.
Inspect The Fuel Gauge Needle:
- A misaligned or stuck fuel gauge needle can give you false readings or prevent the gauge from displaying any information. Here’s what you can do:
- Start by visually inspecting the fuel gauge needle.
- Ensure that the needle is properly aligned with the fuel gauge markings.
- Gently tap the gauge or try moving the needle manually to see if it responds.
- If the needle is stuck or not moving smoothly, it might be necessary to replace the gauge altogether.
Remember, diagnosing the issue with your scooter’s fuel gauge may require a bit of trial and error. By following these steps, you can effectively troubleshoot the problem and get your gauge back in working order.

Credit: m.youtube.com
Solutions For A Non-Working Fuel Gauge
If your scooter’s fuel gauge is not working, there are solutions to help you accurately monitor your fuel levels. These solutions can ensure you never run out of gas unexpectedly during your rides.
If you’re experiencing issues with your scooter’s fuel gauge, you’re not alone. A non-working fuel gauge can be frustrating and inconvenient, but fortunately, there are several solutions to address this problem. Read on to discover the possible fixes for a faulty fuel gauge.
Clean Or Replace Corroded Wiring Connections:
- Check the wiring connections: Inspect the wiring connections associated with the fuel gauge. Over time, corrosion can accumulate, leading to poor contact and malfunctioning readings.
- Clean the connections: Using a suitable electrical contact cleaner, gently remove any corrosion from the wiring connections. Ensure that the connections are dry before proceeding.
- Inspect for damage: In case the wiring has sustained damage, such as fraying or breakage, it may be necessary to replace the affected wires.
- Replace corroded connections: If the cleaning process does not resolve the issue, consider replacing the corroded wiring connections with new ones.
Replace The Faulty Fuel Level Sensor:
- Locate the fuel level sensor: The fuel level sensor is responsible for measuring the amount of fuel in the tank and transmitting the information to the fuel gauge. It is typically located within the fuel tank.
- Remove the sensor: Follow the manufacturer’s instructions to safely remove the faulty fuel level sensor from the fuel tank.
- Install a new sensor: Purchase a compatible replacement fuel level sensor. Install the new sensor carefully, ensuring proper alignment and connection.
- Test the fuel gauge: After installing the new sensor, test the fuel gauge to confirm that it is now functioning correctly and accurately displaying the fuel level.
Repair Or Replace The Broken Fuel Gauge Needle:
- Assess the condition of the fuel gauge needle: Inspect the fuel gauge needle for any visible damage, such as bending or dislodgment.
- Attempt repair: If the needle is slightly misaligned or bent, it may be possible to carefully straighten it using gentle pressure or a pair of needle-nose pliers.
- Consider replacement: If the needle is extensively damaged or cannot be repaired, it may be necessary to replace the fuel gauge altogether.
- Replace the fuel gauge: Purchase a suitable replacement fuel gauge that matches your scooter model. Follow the manufacturer’s instructions to install the new gauge correctly.
By following these potential solutions, you can address issues with a non-working fuel gauge on your scooter. Whether it involves cleaning or replacing wiring connections, replacing the faulty fuel level sensor, or repairing/replacing the broken fuel gauge needle, these steps will help you restore the functionality of your fuel gauge.
Ensure to consult your scooter’s manual or seek professional assistance if needed.
Diy Steps To Fix A Fuel Gauge
Having trouble with your scooter’s fuel gauge? Don’t worry, fix it yourself with these simple and easy-to-follow DIY steps. Get your gauge working properly again in no time.
Is the fuel gauge on your scooter not working? Don’t worry, you can try fixing it yourself before heading to a professional. Follow these simple steps to troubleshoot and repair your scooter’s fuel gauge:
Step 1: Disconnect The Scooter’S Battery
- Locate the battery of your scooter.
- Carefully disconnect the negative terminal of the battery to prevent any electrical mishaps.
- Ensure the scooter is turned off before proceeding to the next steps.
Step 2: Locate The Fuel Gauge And Remove The Dashboard Panel
- Identify the dashboard panel on your scooter where the fuel gauge is usually located.
- Use the necessary tools to remove the panel, taking care not to damage any components.
- Keep the screws or fasteners in a safe place to avoid losing them.
Step 3: Inspect The Wiring Connections And Clean Or Replace As Needed
- Examine the wiring connections leading to the fuel gauge.
- Look for any loose or damaged wires that may be causing the issue.
- If you find any loose connections, secure them properly.
- In case of damaged wires, replace them with new ones for a reliable connection.
Step 4: Test The Fuel Level Sensor Using A Multimeter
- Set your multimeter to the resistance or ohms measurement function.
- Disconnect the fuel level sensor from the wiring harness.
- Connect the multimeter probes to the sensor terminals.
- Observe the multimeter reading and compare it to the specifications provided by the manufacturer.
- If the reading deviates significantly from the expected value, the sensor may be faulty.
Step 5: Replace The Sensor If It Is Faulty
- If the fuel level sensor is determined to be faulty, it will need to be replaced.
- Purchase a compatible replacement sensor from a trusted supplier.
- Disconnect the old sensor from the wiring harness and remove it from the fuel tank.
- Install the new sensor and connect it securely to the wiring harness.
Step 6: Check The Fuel Gauge Needle For Any Damage
- Inspect the fuel gauge needle for any signs of damage or wear.
- If the needle is broken, bent, or stuck, it may need to be repaired or replaced.
- Repair or replace the fuel gauge needle according to the manufacturer’s recommendations.
Step 7: Reassemble The Dashboard Panel And Reconnect The Battery
- Carefully reassemble the dashboard panel, ensuring all components fit snugly.
- Securely tighten the screws or fasteners without over-tightening.
- Reconnect the scooter’s battery by attaching the negative terminal first, followed by the positive terminal.
- Double-check all connections and gently start the scooter to test if the fuel gauge is functioning properly.
By following these DIY steps, you’ll have a good chance of fixing the fuel gauge on your scooter and getting an accurate reading of your fuel level. If the problem persists, it may be time to seek professional assistance or consult the scooter’s manufacturer for further guidance.
When To Seek Professional Help
If the fuel gauge on your scooter is not working, it may be time to seek professional help. Don’t wait until you run out of gas unexpectedly. Get the problem fixed by a trained technician to ensure accurate fuel monitoring and a smooth ride.
If DIY steps don’t resolve the issue:
- Inspect the wiring connections: Check for any loose or disconnected wires around the fuel gauge. Reconnect them securely and ensure a proper connection.
- Check the fuel gauge sensor: The sensor may be faulty or damaged, causing inaccurate readings. Replacing it might solve the problem.
- Test the gauge unit: Use a multimeter to check if the fuel gauge unit itself is functioning properly. If it’s not receiving or sending the correct electrical signals, it may need to be replaced.
If you’re not comfortable working with electrical components:
- Electrical systems require caution: Dealing with electrical components can be hazardous if you’re not experienced or comfortable doing so. It’s best to leave such tasks to a professional who has the knowledge and expertise to handle them safely.
- Prevent further damage: Mishandling the electrical components can result in additional problems or even cause harm to yourself or the scooter. Seeking professional help will ensure that the issue is addressed correctly without any added complications.
If the problem persists or reoccurs after repair:
- Hidden underlying issues: Persistent fuel gauge problems even after following DIY steps or seeking initial repairs may indicate a more complex issue. Consulting a professional can help uncover any hidden underlying problems that may require specialized knowledge or equipment to diagnose and fix.
- Saves time and effort: Continuously attempting DIY fixes without success can be frustrating and time-consuming. Seeking professional help from the start can save you valuable time and effort, ensuring a quicker resolution to the fuel gauge issue.
- Expert diagnosis and repair: Professionals have the experience and expertise to accurately diagnose the problem and provide a lasting solution. They have access to specialized tools, wiring diagrams, and technical resources that can help them resolve the issue efficiently.
Remember, if you’re unsure or uncomfortable with any aspect of troubleshooting or repairing the fuel gauge on your scooter, it’s always best to seek professional help. They can ensure a safe and effective resolution to the problem, saving you time, effort, and potentially expensive mistakes.
Preventive Measures To Avoid Fuel Gauge Issues
To avoid fuel gauge issues on your scooter, it is important to take preventive measures. Regularly checking for any signs of damage or malfunction, keeping your scooter well-maintained, and ensuring proper fuel tank filling can help prevent fuel gauge problems.
Preventative Measures To Avoid Fuel Gauge Issues
If your fuel gauge on your scooter is not working properly, it can be frustrating and inconvenient. To prevent fuel gauge issues from occurring, there are a few preventive measures you can take. By following these steps, you can ensure that your fuel gauge operates smoothly and accurately, giving you peace of mind on your rides.
Regularly Inspect And Clean Wiring Connections
One of the main causes of fuel gauge problems is loose or dirty wiring connections. Regularly inspecting and cleaning the wiring connections can help prevent these issues. Here are some tips to follow:
- Check the wiring connections on a regular basis to ensure they are secure and tightly connected.
- Use a clean cloth to wipe away any dirt or debris on the connectors.
- If there is any corrosion on the connectors, gently clean them with a wire brush or a mixture of baking soda and water.
- Make sure there are no loose wires or frayed connections. If you notice any, it’s important to fix or replace them promptly.
By regularly inspecting and cleaning the wiring connections, you can reduce the chances of fuel gauge malfunctions and keep your scooter running smoothly.
Use A High-Quality Fuel Level Sensor
Choosing a high-quality fuel level sensor is essential in avoiding fuel gauge issues. Here’s why it matters:
- High-quality sensors are more accurate and reliable, providing more accurate readings of your fuel level.
- These sensors are designed to withstand diverse weather conditions, preventing damage caused by exposure to extreme temperatures or moisture.
- They are usually made with durable materials that can withstand the vibrations and impacts associated with riding a scooter.
- High-quality sensors often come with warranties, giving you peace of mind in case of any malfunctions.
Investing in a high-quality fuel level sensor will not only offer better performance but also save you from future headaches related to fuel gauge problems.
Avoid Rough Handling Of The Scooter’S Dashboard
The scooter’s dashboard, including the fuel gauge, should be handled with care to avoid unnecessary issues. Follow these tips to ensure proper handling:
- Avoid hitting or forcefully tapping the dashboard, as this can disrupt the fuel gauge’s function or cause internal damage.
- Be mindful when placing items on the dashboard. Heavy objects or rough handling can lead to dislodged connections and inaccurate readings.
- When cleaning the scooter’s dashboard or instrument panel, use gentle cleaning products and a soft cloth to avoid scratching or damaging the gauges.
By treating your scooter’s dashboard with care, you can prevent fuel gauge malfunctions and maintain accurate fuel level readings.
Frequently Asked Questions Of Fuel Gauge On Scooter Not Working
How Do I Reset My Fuel Tank Gauge?
To reset your fuel tank gauge, follow these steps: 1. Locate the fuel gauge reset button. 2. Press and hold the reset button for a few seconds. 3. Release the button once the gauge resets and returns to its starting position.
4. Check the gauge to ensure it is now displaying the correct fuel level.
Why Is My Fuel Gauge Not Working On My Motorcycle?
The motorcycle fuel gauge may not be working due to a faulty sensor or wiring issue.
How Does Scooter Fuel Gauge Work?
The scooter fuel gauge measures the amount of fuel in your scooter’s tank. It shows you how much gas you have left.
What Causes The Fuel Gauge Not To Work?
The fuel gauge may not work due to a faulty sender unit or a malfunctioning wiring connection.
Conclusion
A malfunctioning fuel gauge on your scooter can cause major inconveniences and potentially lead to unexpected breakdowns. It is important to address this issue promptly to ensure your scooter is reliable and efficient. Begin by identifying potential causes such as a faulty sensor, wiring problems, or a malfunctioning gauge itself.
Once the issue has been diagnosed, you can determine the best course of action, whether it be repairing or replacing the faulty components. Regular maintenance and care for your scooter’s fuel system is crucial to avoid further problems in the future.
By keeping a close eye on fuel consumption and monitoring any irregularities, you can prevent yourself from being stranded on the road due to an empty tank. Don’t hesitate to reach out to a professional if you are unsure or inexperienced in dealing with fuel gauge issues.
With proper attention and timely repairs, you can ensure a smooth and worry-free ride on your scooter.