Okai Scooter Not Accelerating : Overcome the Stalling Woes
Okai Scooter not accelerating could be due to various reasons such as a malfunctioning throttle, a faulty motor controller, or a drained battery. To troubleshoot this issue, check if the throttle is working properly by testing it with a multimeter, inspect the motor controller for any signs of damage or loose connections, and ensure the battery is adequately charged.
If these steps do not resolve the problem, it may be necessary to seek professional assistance for further diagnosis and repairs. Riding an electric scooter can be an efficient and eco-friendly mode of transportation, but occasional issues like this can arise, requiring proper troubleshooting for a safe and enjoyable experience.
Faulty Battery Connections
The Okai scooter’s lack of acceleration may be due to faulty battery connections. Ensure the battery connections are secure and properly aligned to address this issue promptly.
If your Okai scooter is not accelerating, one possible cause could be faulty battery connections. Here are some reasons why this might be happening:
Loose Battery Cables:
- Loose battery cables can result in a poor connection between the battery and the scooter’s electrical system.
- Check if the battery cables are securely attached to the battery terminals.
- Make sure the cables are firmly connected to their respective terminals and are not loose.
Corroded Battery Terminals:
- Corrosion on the battery terminals can obstruct the flow of electricity and prevent the scooter from accelerating.
- Inspect the battery terminals for any signs of corrosion, such as a greenish substance.
- Clean the terminals using a mixture of baking soda and water, along with a wire brush to gently scrub away the corrosion.
- Once cleaned, dry the terminals thoroughly before reconnecting the battery cables.
Battery Cable Damage:
- Damaged battery cables can disrupt the power supply to the scooter’s motor and lead to acceleration issues.
- Inspect the battery cables for any visible signs of damage, such as frayed wires or exposed metal.
- If you notice any damage, consider replacing the cables with new ones to ensure a proper connection.
Battery Voltage:
- Low battery voltage can also contribute to acceleration problems.
- Use a multimeter to check the voltage of your scooter’s battery.
- If the voltage is below the recommended level, it may be time to recharge or replace the battery.
Battery Connections Are Crucial For The Proper Functioning Of Your Okai Scooter’S Electrical System. Ensure That The Battery Cables Are Securely Attached To The Battery Terminals And Are Not Loose. In Addition, Combat Any Corrosion On The Battery Terminals By Cleaning Them Thoroughly With A Mixture Of Baking Soda And Water. If The Battery Cables Show Signs Of Damage, Replacement May Be Necessary. Lastly, Check The Battery Voltage To Rule Out Any Low Voltage Issues. By Addressing These Potential Causes Related To Faulty Battery Connections, You Can Troubleshoot And Resolve The Acceleration Problem With Your Okai Scooter.
Throttle Issues
The Okai scooter issue of not accelerating could be due to throttle problems. If your scooter is not accelerating, it’s crucial to address throttle issues to ensure a smooth ride. Get to the root of the problem and resolve it promptly to enjoy a hassle-free scooter experience.
Sticking Throttle
If your Okai scooter is not accelerating as it should, one possible issue may be a sticking throttle. This can occur due to various reasons, such as dirt, debris, or rust accumulating in the throttle mechanism. Here are some potential causes and solutions to address this problem:
- Build-up of dirt or debris: Over time, dirt and debris can accumulate in the throttle assembly, leading to a sticky throttle. To resolve this, follow these steps:
- First, turn off the scooter and disconnect the battery.
- Locate the throttle assembly, usually positioned near the handlebars.
- Carefully inspect the throttle for any visible dirt or debris.
- Use a clean cloth or a soft brush to remove the dirt or debris.
- Reconnect the battery and turn on the scooter to check if the throttle is functioning smoothly.
- Lubrication issues: In some cases, lack of lubrication can cause the throttle to stick. To address this problem:
- Identify the throttle cable and lever.
- Apply a small amount of silicone lubricant to the moving parts of the throttle assembly.
- Gently move the throttle back and forth to distribute the lubricant evenly.
- Test the acceleration to see if the sticking issue is resolved.
- Mechanical problems: In rare cases, the sticking throttle might result from internal mechanical issues. If the above methods do not resolve the problem, it is advisable to consult a professional technician or reach out to the manufacturer for assistance.
It is important to note that troubleshooting and fixing sticking throttle issues should be done with utmost care to ensure the safety of both the rider and the scooter.
Damaged Throttle Cable
Another potential reason why your Okai scooter might not be accelerating is a damaged throttle cable. The throttle cable is responsible for transmitting the user’s acceleration input to the scooter’s motor. If this cable becomes damaged or worn, it can lead to a loss of acceleration.
Here are a few signs and solutions to address a damaged throttle cable:
- Visual inspection: Take a close look at the throttle cable for any visible signs of damage, such as fraying or kinks.
- Testing continuity: Use a multimeter to test the continuity of the throttle cable. If there is no continuity, it indicates a break or damage in the cable.
- Replace the throttle cable: If the throttle cable is damaged, it will need to be replaced. Refer to the manufacturer’s instructions or seek professional help to ensure the proper replacement of the throttle cable.
Remember, it is crucial to address any issues related to the throttle cable promptly to ensure the safe operation of your Okai scooter. Regular maintenance and inspections can help prevent throttle-related problems in the future.
These potential solutions should help you identify and address throttle issues that may be causing your Okai scooter not to accelerate properly. Make sure to follow appropriate safety precautions and consult professionals if needed in order to ensure the best results for your scooter.
Motor Malfunction
The Okai scooter may experience motor malfunction, resulting in a lack of acceleration. This issue can be resolved by addressing the root cause and seeking professional assistance for repairs.
Burnt-Out Motor:
If your Okai scooter is not accelerating, one possible cause could be a burnt-out motor. This can happen due to various reasons and requires immediate attention and repair. Here are some signs and symptoms that indicate a burnt-out motor:
- Unusual noises: If you hear strange grinding, rattling, or screeching sounds coming from your scooter’s motor, it could be a sign of a burnt-out motor.
- Overheating: Excessive heat coming from the motor, often accompanied by a burning smell, is an indicator of a motor malfunction.
- Reduced power: When your scooter struggles to gain speed or experiences a significant decrease in acceleration, it’s likely due to a burnt-out motor.
- Frequent stalling: If your scooter frequently stalls or fails to start after prolonged attempts, it could be due to a burnt-out motor.
If you observe any of these signs, it’s crucial to address the issue promptly. Contact a professional technician or a service center authorized by Okai for a thorough inspection and repair.
Motor Controller Failure:
Another possible reason that may prevent your Okai scooter from accelerating is a motor controller failure. The motor controller acts as the interface between the battery, motor, and throttle, controlling the scooter’s acceleration and speed. Here are some common indicators of motor controller failure:
- Erratic acceleration: If your scooter’s speed fluctuates abruptly or behaves unpredictably when you apply the throttle, it may indicate a motor controller malfunction.
- Complete loss of power: When the motor controller fails, your scooter may experience a total loss of power, rendering it unable to accelerate.
- Faulty brake functionality: In some cases, a motor controller failure can also affect the proper functioning of the brakes, making your scooter unsafe to ride.
- Error codes: Okai scooters are often equipped with advanced electronic systems that can display error codes when there is an issue. If you see error codes related to the motor controller, it is likely the cause of the acceleration problem.
If you suspect that a motor controller failure is the reason behind your scooter’s acceleration issue, it is essential to seek professional assistance. Contact Okai customer support or consult an authorized service center to diagnose and resolve the motor controller problem.
Remember, addressing motor malfunctions promptly ensures your safety and helps maintain the longevity of your Okai scooter.
Checking Battery Cables
To address an Okai scooter not accelerating, it is crucial to check the battery cables. Ensure they are securely connected and free from any damage to resolve this issue effectively.
When your Okai scooter is experiencing issues with acceleration, it could be due to loose connections in the battery cables. To diagnose and resolve this problem, follow the steps below:
- Inspecting for loose connections:
- Start by visually inspecting the battery cables for any signs of looseness or disconnection.
- Ensure that the cables are securely connected to the battery terminals without any gaps or wiggling.
- Look for any corrosion or rust on the cable ends or terminals, as this can also hinder proper connectivity.
- If you notice any loose connections or signs of corrosion, it’s important to address them promptly to restore the scooter’s performance.
- Tightening battery cable connections:
- To tighten loose connections, begin by disconnecting the battery from the scooter.
- Use a wrench or pliers to securely tighten the cable connections, both at the battery terminals and the scooter’s electrical components.
- Ensure that the connections are tightened enough to eliminate any play or movement, but be careful not to overtighten and damage the terminals.
- After tightening the connections, reconnect the battery to the scooter.
- Test the scooter’s acceleration to see if the issue is resolved. If not, further troubleshooting may be necessary.
By inspecting and tightening the battery cable connections, you can address one of the potential causes behind your Okai scooter’s lack of acceleration. Remember to conduct these steps carefully to prevent any damage and always prioritize safety when working with electrical components.
Cleaning Corroded Battery Terminals
To resolve the issue of an Okai scooter not accelerating, one possible solution is to clean the corroded battery terminals. This can be done using a wire brush and a mixture of baking soda and water to remove any buildup and restore proper electrical contact.
If you find that your Okai scooter is not accelerating properly, one of the possible causes could be corroded battery terminals. Over time, dirt, moisture, and corrosion can build up on the terminals, affecting the flow of electricity. Cleaning these terminals can help resolve the issue and get your scooter back in top shape.
Follow these steps to clean the corroded battery terminals:
Removing Battery Terminals
To begin the cleaning process, you’ll need to remove the battery terminals from your Okai scooter. Here’s how you can do it:
- Locate the battery compartment on your scooter.
- Use a screwdriver or an appropriate tool to loosen and remove the screws securing the battery terminals.
- Gently pull the terminals away from the battery, ensuring not to damage any wiring.
Cleaning With A Wire Brush
Once the battery terminals are removed, it’s time to clean them thoroughly using a wire brush. Here’s how you can do it:
- Inspect the terminals for any visible signs of corrosion or buildup. Corrosion typically appears as a powdery substance on the metal surface.
- Take a wire brush and scrub the terminals gently but firmly. The bristles of the brush will help remove the dirt, corrosion, and any other debris.
- Ensure you cover all areas, including the top, bottom, and sides of the terminals.
Reattaching Terminals Securely
After cleaning the battery terminals, it is crucial to reattach them securely to ensure proper functioning. Follow these steps to reattach the terminals properly:
- Align the terminals with the battery and gently push them back into place.
- Tighten the screws that secure the terminals using a screwdriver or the appropriate tool.
- Make sure the terminals are snugly attached, but avoid overtightening, as it may damage the terminals or the battery.
By following these steps and cleaning the corroded battery terminals on your Okai scooter, you can improve its overall performance and restore the acceleration. Regular maintenance of your scooter’s battery terminals can prevent future issues and keep your scooter running smoothly for longer periods.
Fixing A Sticking Throttle
Is your Okai scooter not accelerating? Learn how to fix a sticking throttle and get your scooter back on the road smoothly.
Do you find that your Okai scooter is not accelerating as it should? One possible reason for this issue could be a sticking throttle. A sticking throttle can occur due to various factors such as dirt, debris, or even damage to the throttle components.
Thankfully, there are a few simple steps you can follow to fix this problem and get your scooter running smoothly again.
Lubricating The Throttle Mechanism
To address a sticking throttle, you can start by lubricating the throttle mechanism. Here’s how you can do it:
- Begin by locating the throttle cable where it connects to the handlebar grip.
- Carefully disconnect the cable from the grip and slide it off.
- Take a few drops of silicone lubricant and apply them to the exposed cable.
- Gently slide the cable back onto the grip and reconnect it securely.
- Move the throttle back and forth a few times to spread the lubricant evenly.
- Test the scooter to see if the throttle is now operating smoothly.
Replacing Damaged Throttle Components
If lubricating the throttle mechanism doesn’t solve the problem, the issue might be with damaged throttle components. In such cases, you may need to replace these components. Here are the steps to follow:
- Refer to the scooter’s user manual or contact the manufacturer to obtain the correct replacement parts for the throttle.
- Start by disconnecting the throttle cable from the grip, following the same steps mentioned earlier.
- Using the appropriate tools, remove any screws or bolts that secure the damaged throttle components.
- Carefully replace the damaged components with the new ones.
- Double-check that all connections are secure and tight.
- Reconnect the throttle cable to the grip and ensure it is properly attached.
- Test the scooter’s throttle to verify if the issue has been resolved.
By following these simple steps, you can effectively fix a sticking throttle on your Okai scooter. Remember to lubricate the throttle mechanism as a first step and move on to replacing damaged components if necessary. With a smooth-functioning throttle, you can enjoy a safer and more enjoyable riding experience on your scooter.
Checking And Replacing A Damaged Throttle Cable
Replace a damaged throttle cable to fix an Okai scooter not accelerating. Easily diagnose and rectify the issue by following these simple steps.
Is your Okai scooter not accelerating as it should? One possible issue could be a damaged throttle cable. The throttle cable is responsible for transmitting the action of twisting the throttle to the scooter’s engine, allowing it to accelerate. Over time, the cable may become frayed or damaged, hindering its effectiveness.
In this section, we’ll explore how to inspect for fraying or damage, as well as how to replace the throttle cable if necessary.
Inspecting For Fraying Or Damage
To determine if your throttle cable is in need of replacement, follow these steps:
- Step 1: Examine the throttle cable exterior for any signs of fraying or visible damage.
- Step 2: Gently move the throttle back and forth while observing the cable. Check for any irregular movements, stiffness, or resistance.
- Step 3: Pay close attention to the area where the throttle cable enters the throttle housing or handlebar grip. Look for any signs of wear or stress.
If you notice any of the above issues during your inspection, it may be an indication that your throttle cable is damaged and needs to be replaced.
Replacing The Throttle Cable
Replacing a damaged throttle cable may seem daunting, but with the right tools and a little bit of patience, it can be done. Here’s a step-by-step guide to help you replace the throttle cable:
- Step 1: Begin by locating the throttle cable on your Okai scooter. It is typically connected to the throttle housing or handlebar grip at one end and the engine at the other.
- Step 2: Start by disconnecting the throttle cable from the throttle housing or handlebar grip. This can usually be done by loosening a screw or bolt that holds it in place.
- Step 3: Move to the engine end of the cable and disconnect it by removing any fasteners or attachments.
- Step 4: Carefully remove the old throttle cable from your scooter, taking note of how it is routed and connected.
- Step 5: Take your new throttle cable and thread it through the same route as the old cable, ensuring it is securely connected at both ends.
- Step 6: Once in place, reattach the throttle cable to the throttle housing or handlebar grip and tighten any screws or bolts.
- Step 7: Finally, reconnect the other end of the throttle cable to the engine, making sure it is securely fastened.
By following these steps, you should be able to replace a damaged throttle cable on your Okai scooter. Remember to double-check all connections and ensure the cable is properly routed before testing the scooter’s acceleration.
With a properly functioning throttle cable, your Okai scooter should regain its ability to accelerate smoothly, allowing you to fully enjoy the ride once again.
Diagnosing A Burnt-Out Motor
Diagnosing a burnt-out motor in your Okai scooter can be a challenging task. If your scooter is not accelerating as it should, it may be due to a burnt-out motor, which can cause a lack of power and sluggish performance.
To determine if this is the issue, you can check for any unusual noises, smell for burning odors, or inspect the motor for signs of damage. If you suspect a burnt-out motor, it is recommended to seek professional assistance for repair or replacement.
Is your Okai scooter not accelerating as it should? There could be a possibility that the motor is burnt-out. Don’t fret, though! In this section, we’ll guide you through the process of diagnosing and replacing a burnt-out motor, so you can get back on the road with ease.
Testing Motor Functionality
To determine if your Okai scooter’s motor is burnt-out, follow these steps:
- Visual inspection: Start by visually examining the motor for any signs of damage or burning. Look out for melted wires, blackened components, or a distinct burning smell.
- Battery check: Ensure that the battery is fully charged and functional. A weak or faulty battery can indicate motor problems.
- Connections verification: Examine the motor’s connections and wiring. Loose or damaged connections can prevent the motor from functioning properly.
- Motor noise: Pay attention to any abnormal noise coming from the motor. Grinding or screeching sounds might be an indication of a burnt-out motor.
- Resistance test: Use a multimeter to measure the electrical resistance of the motor. If the reading is significantly higher or lower than the manufacturer’s specifications, it could suggest a burnt-out motor.
- Professional assistance: If you’re still unsure about the motor’s condition, consider seeking the help of a professional technician who can conduct thorough diagnostic tests.
Replacing A Burnt-Out Motor
If you have determined that your Okai scooter’s motor is indeed burnt-out, it’s time to replace it. Follow these steps:
- Acquire a new motor: Purchase a compatible motor from an authorized dealer or directly from the manufacturer. Ensure that it matches the specifications and requirements of your Okai scooter model.
- Safety first: Before proceeding with the replacement, make sure your scooter is turned off and disconnected from any power source.
- Remove the old motor: Disconnect the wires and any other attachments from the burnt-out motor. Carefully remove it from its housing, taking note of the location and arrangement of components for reassembly.
- Install the new motor: Position the new motor correctly in the housing, aligning it with the mounting holes. Reattach the wires and any other components removed during the previous step, ensuring secure connections.
- Double-check: Before closing up the motor housing, double-check that all connections are properly secured and that there are no loose wires.
- Test the scooter: Once the new motor is in place, turn on the scooter and test its acceleration. If everything is working correctly, you should notice improved performance.
Remember, if you’re unsure about replacing the motor yourself, it’s always best to consult a professional technician to avoid any damage or further complications.
Addressing Motor Controller Failure
Addressing motor controller failure is crucial when your Okai scooter is not accelerating. By diagnosing and fixing this issue, you can ensure a smooth and reliable ride. Trust the experts to identify and resolve the problem efficiently.
Verifying Motor Controller Status:
- One of the common reasons for an Okai scooter not accelerating is a malfunctioning motor controller. To address this issue, you need to verify the status of the motor controller. Here’s how you can do it:
- Check the display panel: Look for any error codes or warnings displayed on the control panel. These codes can provide valuable insights into the motor controller’s condition.
- Inspect the wiring connections: Ensure that all the wiring connections between the motor controller and other components are secure and properly connected. Loose or damaged wires can cause issues with acceleration.
- Use a multimeter: With the scooter turned off, use a multimeter to check the voltage output from the motor controller. Compare the readings with the specifications provided by Okai. Any significant deviation might indicate a faulty motor controller.
- Test the throttle: The throttle is directly linked to the motor controller and plays a crucial role in acceleration. Test the throttle’s functionality by checking if it smoothly transitions through all speed levels. A faulty throttle can falsely restrict the acceleration.
- Inspect the motor controller visually: Examine the motor controller for any visible signs of damage, such as burn marks or melted components. Physical damage can signify a failure in the motor controller.
Replacing A Faulty Motor Controller:
- If you have confirmed that the motor controller is indeed faulty, the next step is to replace it. Follow these steps to ensure a successful replacement:
- Gather the necessary tools: Before starting the replacement process, gather the required tools such as a screwdriver, pliers, and a wrench.
- Turn off the scooter: Ensure that the scooter is completely powered off before proceeding with the replacement. This step is essential for your safety.
- Locate the motor controller: The motor controller is typically located near the scooter’s battery compartment. Refer to the user manual or consult Okai’s website for specific instructions.
- Disconnect the old motor controller: Carefully disconnect the wiring connections from the old motor controller. Take note of the connections to ensure proper reinstallation.
- Remove the old motor controller: Unscrew or unclip the old motor controller from its mounting position. Take additional precautions to prevent any accidental damage to other components during removal.
- Install the new motor controller: Position the new motor controller in the designated mounting location and secure it firmly. Make sure to attach the wiring connections correctly and tightly.
- Double-check the connections: Once the new motor controller is in place, double-check all the wiring connections to ensure they are secure and properly aligned.
- Test the scooter: Turn on the scooter and test the acceleration. If the new motor controller has been installed correctly, the scooter should now accelerate smoothly.
Remember, addressing motor controller failure requires attention to detail and careful handling. If you’re unsure about any step, it’s always recommended to seek professional assistance or consult Okai’s technical support for guidance.
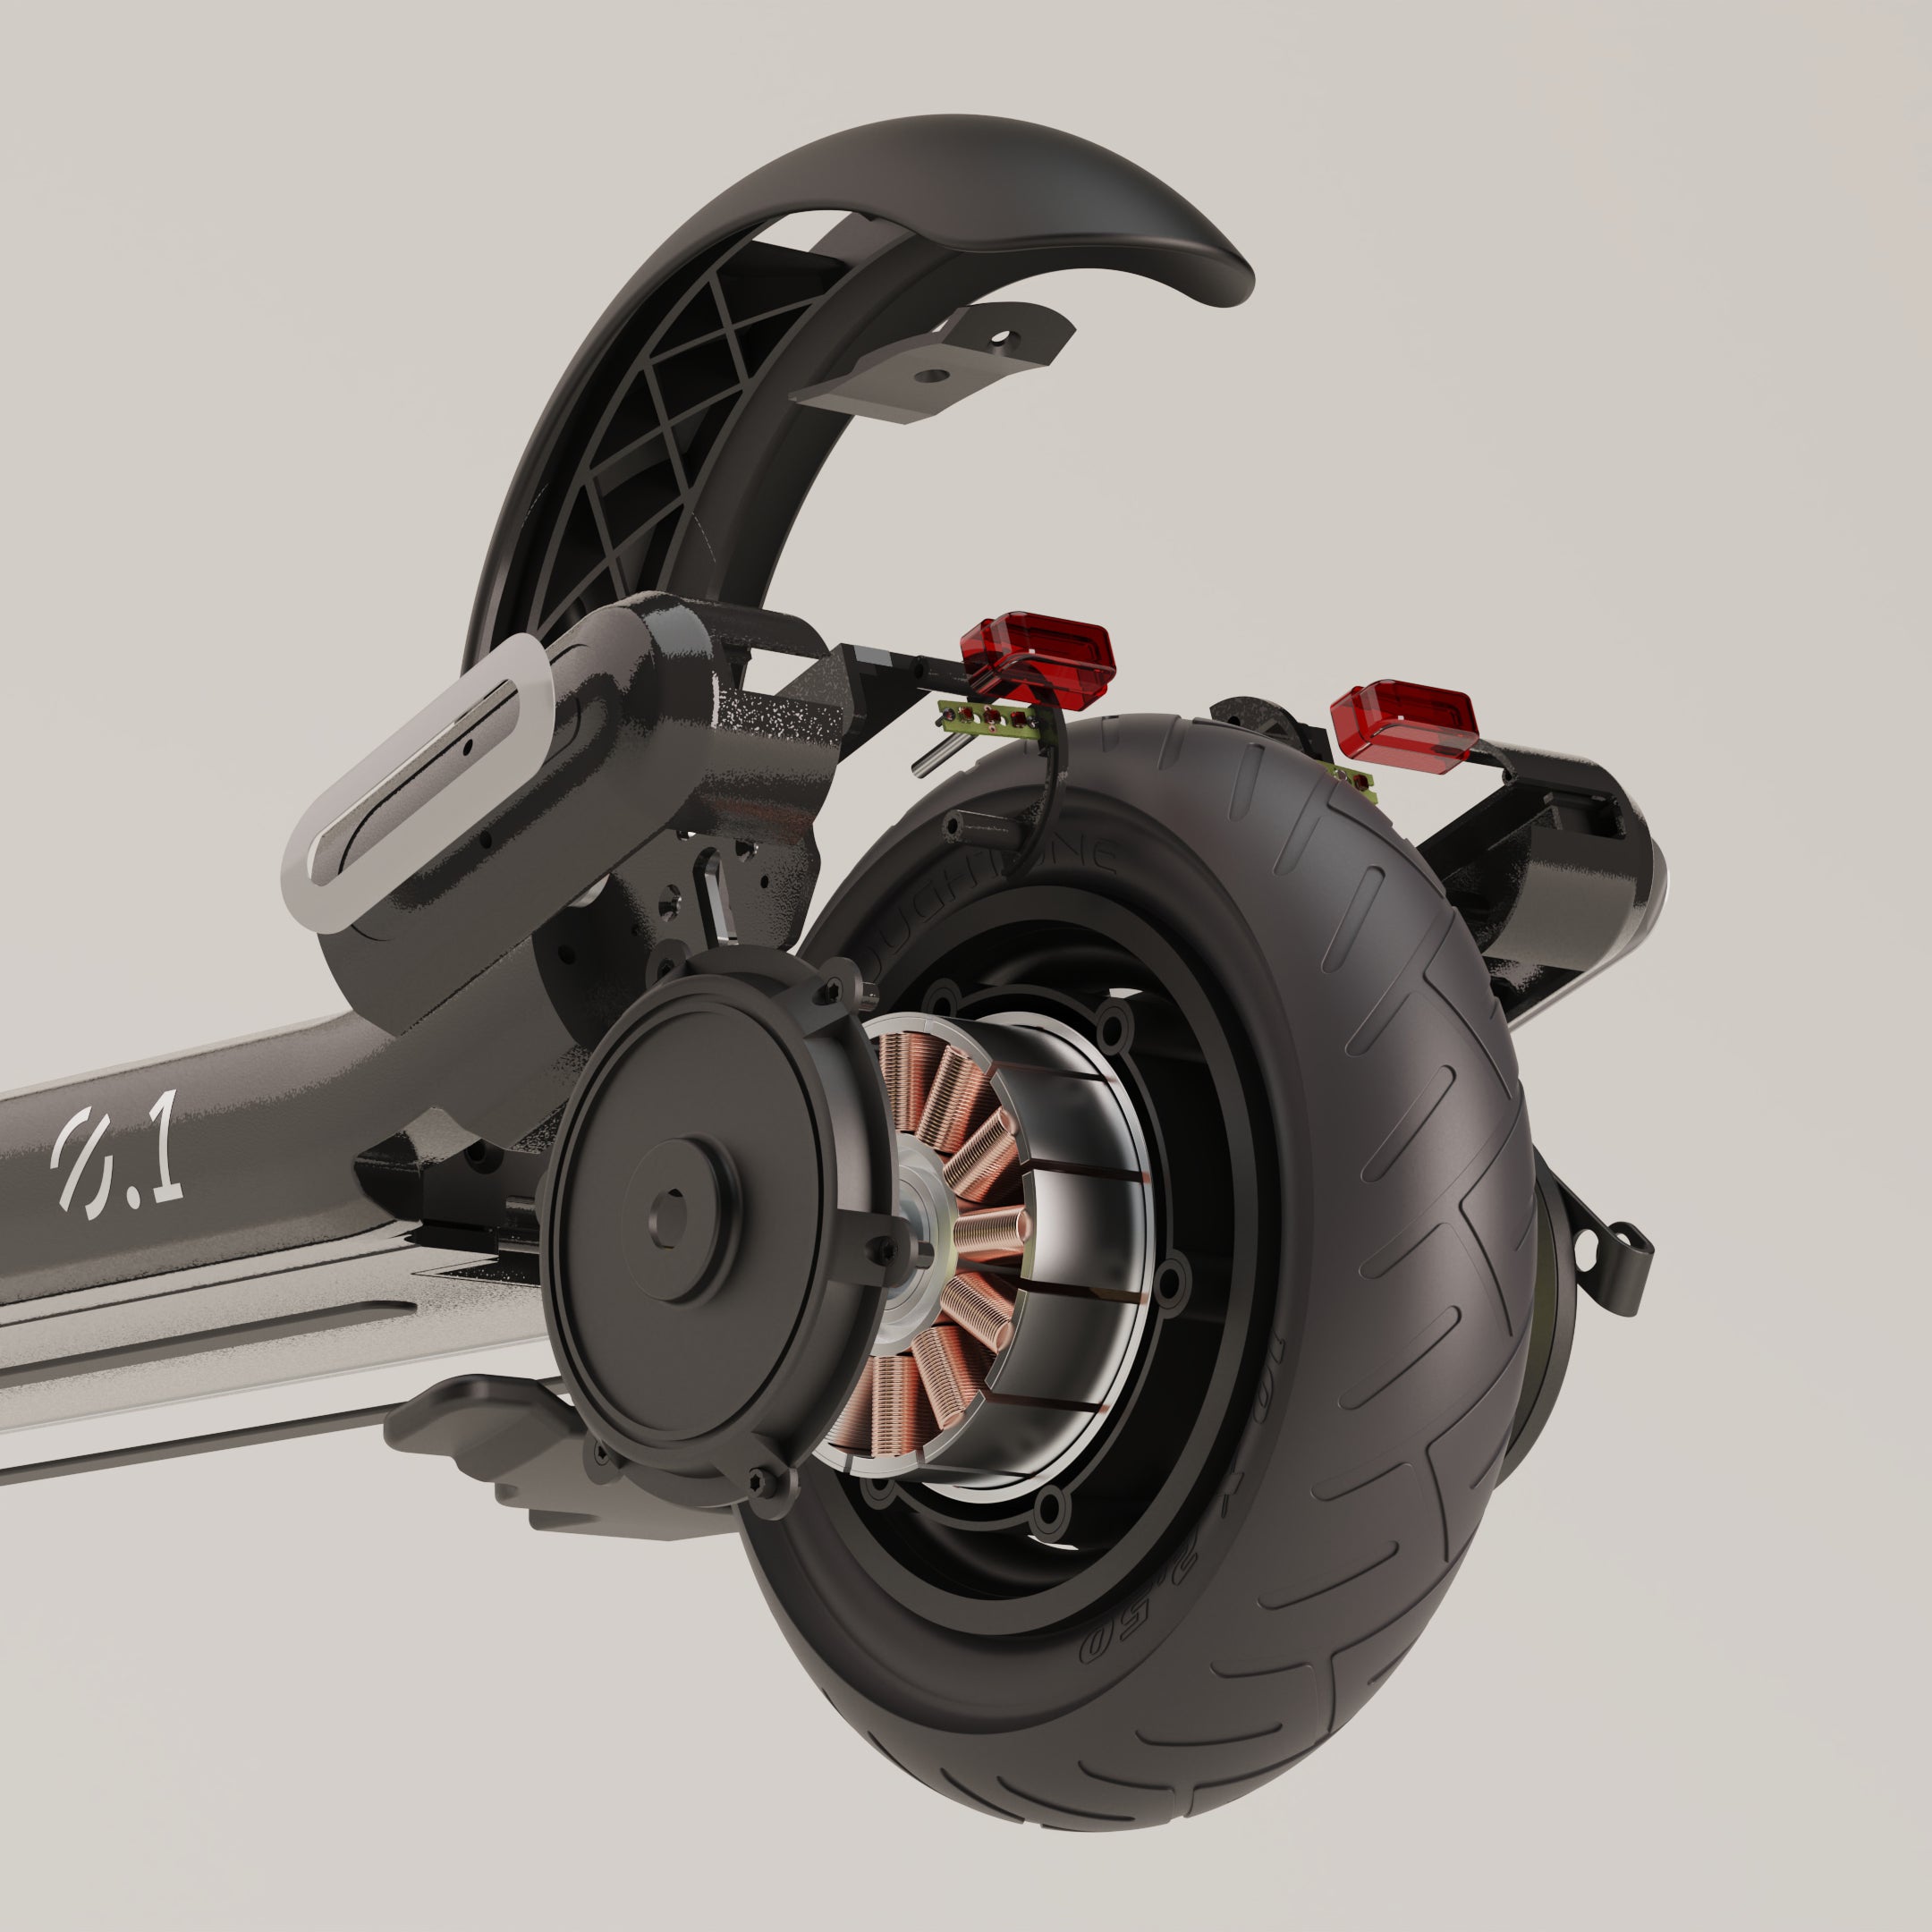
Credit: nought.tech
Frequently Asked Questions Of Okai Scooter Not Accelerating
Why Is My Scooter Not Accelerating?
Your scooter may not be accelerating due to issues with the carburetor, fuel line, spark plug, or transmission.
Why Does My Scooter Not Engage When I Apply The Throttle?
Your scooter may not engage when you apply the throttle due to issues with the throttle cable or throttle body.
How Do You Fix An Accelerator On An Electric Scooter?
To fix an accelerator on an electric scooter, follow these steps: 1) Check for loose connections, 2) Clean the accelerator components, 3) Replace any faulty parts, 4) Test the scooter to ensure the accelerator is working properly.
Why Does My Electric Scooter Turn On But Not Move?
The electric scooter may not move if there is a problem with the motor or the battery.
Conclusion
Troubleshooting an Okai scooter that is not accelerating can be frustrating, but by following these steps you can resolve the issue. First, ensure the scooter has a full battery charge and the power switch is turned on. Next, check the throttle and brake levers to ensure they are functioning properly.
You should also inspect the motor connections and wiring for any loose or damaged parts. If the scooter still does not accelerate, consulting the user manual or contacting Okai customer support can provide further guidance. Remember to always prioritize safety and wear protective gear when riding.
Regular maintenance, such as checking tire pressure and inspecting for any signs of wear and tear, can prolong the life of your scooter and ensure its optimal performance. By taking these steps, you can get your Okai scooter back on the road and enjoy a smooth riding experience.