Ola Scooter Not Switching on: Troubleshooting Tips for a Quick Fix
The Ola scooter not switching on could be due to a faulty battery or an electrical issue. It is important to check the battery connections and ensure they are secure.
Additionally, you should check the fuse and replace it if necessary. If the problem persists, it is recommended to contact Ola customer support for further assistance.
Check Battery Connection
To solve the issue of your Ola scooter not switching on, it’s crucial to check the battery connection. Ensure the battery is securely connected to avoid any power supply interruptions.
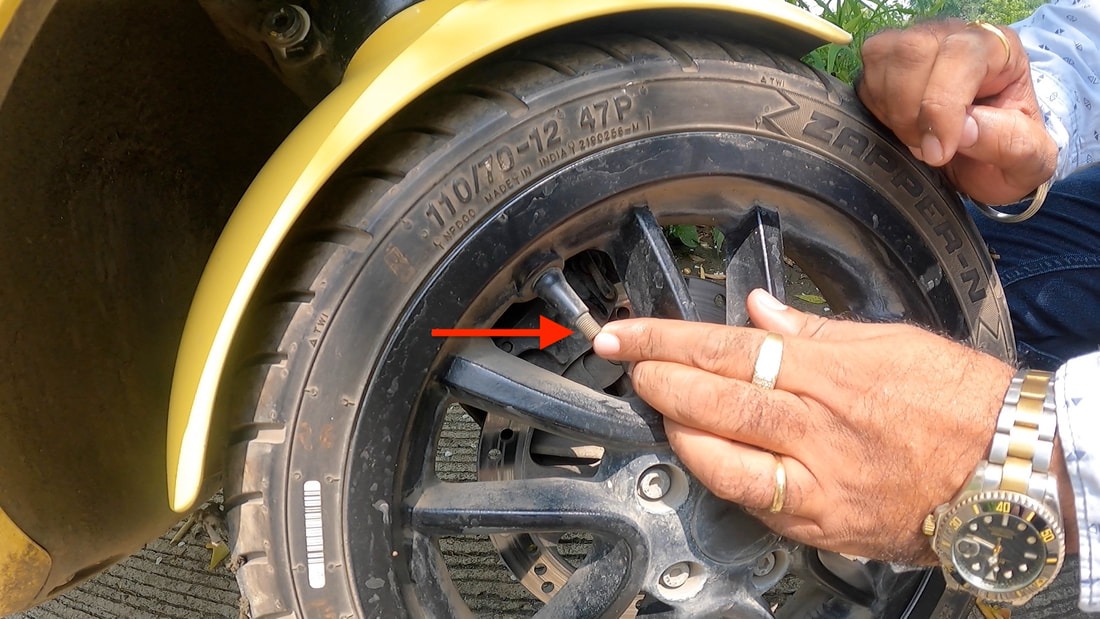
Ola Scooter Not Switching On:
Is your Ola Scooter not turning on? Before you jump to more complex troubleshooting steps, it’s always a good idea to check the battery connection. A loose or poorly connected battery can prevent your scooter from starting up. In this section, we’ll explore the steps you can take to ensure the battery connections are secure and functioning properly.
Ensure Battery Connections Are Secure
- Inspect the battery terminals to ensure they are tightly connected to the scooter’s wiring harness.
- Make sure the positive (+) and negative (-) terminals are properly aligned and securely fastened.
- Check for any signs of damage or corrosion on the battery terminals.
Clean Battery Terminals If Dirty Or Corroded
- If you notice dirt or corrosion on the battery terminals, it is important to clean them to ensure a good connection.
- Use a battery terminal cleaner or a mixture of baking soda and water to gently remove any corrosion.
- Thoroughly clean both the positive (+) and negative (-) terminals with a wire brush or a clean cloth.
- Make sure to dry the terminals completely before reconnecting the battery.
Test Voltage With Multimeter
- If the battery connections appear to be secure and free from corrosion, the next step is to test the voltage with a multimeter.
- Switch on the multimeter and set it to the DC voltage range suitable for your scooter’s battery.
- Connect the multimeter’s positive lead to the positive (+) terminal of the battery and the negative lead to the negative (-) terminal.
- Read the voltage displayed on the multimeter. If the voltage is below the recommended level, it may indicate a problem with the battery’s charge or health.
By following these steps, you can ensure that your Ola Scooter’s battery connections are secure and functioning properly. This can potentially resolve issues with your scooter not switching on. If the problem persists, it is advisable to contact a professional technician or the manufacturer for further assistance.
Keep your scooter’s battery connections clean and well-maintained to ensure optimal performance.
Examine Fuse
Examine the fuse if your Ola scooter is not switching on. Check if the fuse is blown and replace it if necessary to restore power to your scooter.
Have you been facing issues with your Ola scooter not switching on? Don’t worry; we’ve got you covered! One possible culprit behind this problem could be a blown fuse. In this section, we will guide you through the steps to locate and inspect the fuse box, check for a blown fuse, and replace it if necessary.
Let’s get started!
Locate And Inspect Fuse Box
To begin troubleshooting the issue of your Ola scooter not switching on, you’ll need to locate the fuse box and inspect it for any potential problems. Here’s how you can do it:
- Position yourself near the handlebars of your scooter.
- Look for a small rectangular or square cover on the front dashboard or beneath the seat.
- Once located, use your fingers or a screwdriver (if required) to remove the cover and reveal the fuse box underneath.
- Take a moment to visually inspect the fuse box for any signs of damage or loose connections.
Check For Blown Fuse
Now that you have located and inspected the fuse box, it’s time to check whether any of the fuses inside are blown. Follow these steps to perform a thorough check:
- Carefully remove each fuse from its socket, one by one.
- Inspect the fuses visually, paying close attention to the filament inside.
- Look for any signs of a broken filament or a blackened appearance, indicating a blown fuse.
- Repeat this process for each fuse in the box.
Replace Fuse If Necessary
If you have identified a blown fuse during the previous step, don’t fret. Replacing it is a relatively straightforward process. Follow these steps to get your Ola scooter up and running again:
- Carefully note down the specifications of the blown fuse, including its amperage rating and any other relevant details.
- Locate a replacement fuse with the same specifications at a nearby auto parts store or from an authorized Ola service center.
- Insert the new fuse into the corresponding socket in the fuse box, ensuring it fits securely.
- Replace the cover over the fuse box, making sure it is properly aligned and locked in place.
By examining the fuse, you have gone through an essential step in troubleshooting your Ola scooter’s power issues. If the problem persists even after replacing the fuse, it is advisable to seek professional assistance or contact Ola’s customer support. Stay tuned for our next section, where we will explore additional troubleshooting steps to help get your Ola scooter back on the road.
Assess Ignition Switch
Having trouble switching on your Ola Scooter? It could be due to an issue with the ignition switch. To assess this, check for any loose connections or damaged wiring that may be causing the problem.
Verify Starter Button Is Functioning Properly:
- Check if the starter button is responding when pressed.
- Ensure there are no loose connections or damaged wires attached to the starter button.
- If the starter button is unresponsive or shows signs of damage, it may need to be replaced.
Inspect Ignition Switch For Damage Or Loose Wires:
- Examine the ignition switch for any visible signs of damage such as cracks or wear.
- Check for loose or disconnected wires connected to the ignition switch.
- A damaged or faulty ignition switch may prevent the scooter from switching on.
Consider Replacing Ignition Switch If Defective:
- If the ignition switch is found to be defective or damaged, it is advisable to replace it.
- Replacing the ignition switch with a new one can help resolve issues with scooter starting.
Inspect Wiring Connections:
- Thoroughly inspect the wiring connections across the scooter.
- Make sure all connections are secure and properly attached.
- Loose or faulty wiring connections can lead to ignition problems.
Examine Main Wiring Harness:
- Inspect the main wiring harness for any signs of damage or wear.
- Pay attention to any frayed wires or exposed insulation.
- A damaged main wiring harness can cause issues with the scooter’s ignition.
Look For Loose, Damaged Or Disconnected Wires:
- Check all wires connected to the scooter’s ignition system for any signs of damage.
- Ensure there are no loose or disconnected wires.
- Faulty or disconnected wires can prevent the scooter from switching on.
Repair Or Replace Faulty Wiring As Needed:
- If any wiring is found to be faulty, it should be repaired or replaced.
- Fixing damaged wires can help restore proper ignition functionality.
- Seek professional assistance if unsure about repairing or replacing wiring.
Test Charging System:
- Measure the voltage output from the alternator to evaluate the charging system.
- Check if the battery charging voltage is within the recommended range.
- Faulty charging components may need to be replaced to address scooter ignition issues.
Measure Voltage Output From Alternator:
- Use a multimeter to measure the voltage output from the scooter’s alternator.
- Compare the measured voltage with the specifications provided by the manufacturer.
- Deviations from the expected voltage output might indicate a problem with the alternator.
Check Battery Charging Voltage:
- Measure the voltage of the scooter’s battery when the engine is running.
- Verify if the battery charging voltage is within the acceptable range.
- Inadequate charging voltage can lead to ignition problems.
Replace Faulty Charging Components If Necessary:
- If the charging system is identified as the source of the problem, replace any faulty components.
- Defective charging components can impede the ignition process.
- Seeking professional assistance may be necessary for complex charging system repairs.
Verify Spark Plug Operation:
- Remove the spark plug and visually inspect it for signs of damage or wear.
- Test the spark plug for proper ignition using a spark tester or by grounding it against the engine.
- If the spark plug fails to produce a spark or shows significant damage, it should be replaced.
Remove Spark Plug And Inspect For Damage:
- Take out the spark plug and carefully examine its condition.
- Look for cracks, fouling, or any other damage that may affect its performance.
- A damaged spark plug can cause ignition issues in the scooter.
Test Spark Plug For Proper Ignition:
- Ground the spark plug against the engine and attempt to start the scooter.
- Observe if the spark plug produces a visible spark when the engine is cranked.
- If there is no spark or a weak spark, the spark plug may be faulty and require replacement.
Replace Spark Plug If Faulty:
- If the spark plug is determined to be faulty, it should be replaced.
- A functioning spark plug is crucial for the proper combustion and ignition of fuel in the engine.
- Ensure the replacement spark plug is compatible with the scooter’s specifications.
Check Engine Kill Switch:
- Verify that the engine kill switch is in the “On” position, allowing the scooter to start.
- Ensure the kill switch is not inadvertently set to the “Off” position.
- A faulty or improperly set kill switch can prevent the ignition system from functioning.
Ensure Kill Switch Is Set To “On” Position:
- Check if the kill switch is in the correct “On” position.
- Ensure it is not accidentally set to the “Off” position, interrupting the ignition process.
- Positioning the kill switch correctly is essential for starting the scooter.
Clean Or Replace Faulty Kill Switch:
- If the kill switch appears dirty or malfunctioning, clean it thoroughly or consider replacing it.
- Dust, debris, or internal damage can hinder the proper functioning of the kill switch.
- A fully functional kill switch is essential for the ignition system to operate effectively.
Evaluate Fuel System:
- Assess the fuel level in the fuel tank to ensure it is adequate for the scooter to start.
- Inspect the fuel filter and lines for any blockages or clogs.
- Addressing fuel system issues can facilitate proper ignition.
Check Fuel Level In Tank:
- Verify that the fuel tank has an appropriate amount of fuel.
- Insufficient fuel can prevent the scooter from starting.
- Refill the fuel tank as necessary to ensure proper ignition.
Inspect Fuel Filter And Lines For Blockages:
- Examine the fuel filter and fuel lines for any obstructions or blockages.
- Ensure the fuel flow is uninterrupted and free from debris.
- Blockages in the fuel system can impede the ignition process.
Clean Or Replace Clogged Components:
- Clean the fuel filter and lines if they are clogged.
- If cleaning is not sufficient, consider replacing any components that are severely obstructed.
- Clearing blockages in the fuel system can aid in achieving ignition.
Seek Professional Assistance:
- If all troubleshooting steps have been exhausted and the scooter still refuses to switch on, it is advisable to consult a mechanic.
- Professional expertise may be required to identify and resolve complex issues.
- A mechanic can provide specialized knowledge and services to address more challenging problems.
Safety Precautions:
- Always ensure to follow safety guidelines when troubleshooting a scooter’s ignition issues.
- Take necessary precautions to protect yourself and the scooter from potential harm.
- Prioritize safety and employ necessary safety measures throughout the troubleshooting process.

Credit: electrek.co
Frequently Asked Questions Of Ola Scooter Not Switching On
What To Do If Ola Scooter Is Not Starting?
If your Ola scooter is not starting, here are some steps you can take: 1. Check the battery to ensure it is properly charged and connected. 2. Make sure the key is inserted correctly and turned to the “on” position. 3.
Examine the fuse box for any blown fuses and replace if necessary. 4. If all else fails, contact Ola customer support for further assistance.
How Do You Restart The Ola Scooter?
To restart the Ola scooter, simply press and hold the power button until it turns off.
What Is The Problem With Ola S1 Scooters?
The problem with Ola S1 scooters is not specified at this time.
Is Ola Electric Scooter Failed?
No, the Ola electric scooter has not failed.
Conclusion
To summarize, if you are facing issues with your Ola Scooter not switching on, don’t panic. Start by checking the basics like the battery charge, connections, and switches. If these are not the problem, it could be a faulty ignition switch or wiring issue.
In such cases, it is best to consult a professional mechanic who can diagnose and fix the problem for you. Regular maintenance and timely servicing can also help prevent such issues in the future. Remember to keep your scooter stored in a safe and dry place, protect it from extreme weather conditions, and take care of its battery health.
Lastly, always follow the manufacturer’s instructions and guidelines to ensure the longevity and smooth functioning of your Ola Scooter. Happy riding!